IntroductionATEasy 8.0 adds Multiple UUT Testing feature – the ability to test Multiple UUT’s in Sequential, Parallel or Mixed mode, using common test processes. This article provide an introduction to Multiple UUT testing, illustrating the capability with a simple test example that can be download and run on any Windows© platform.
ATEasy Structure OverviewWhen developing test application using ATEasy, the test processes are organized into easy to read sequences of measurements. This is possible because of the structured development environment provided by ATEasy. The structure is achieved by using different Modules to organize code and test objects specific to the processes designed for the modules. The three modules used for holding the test objects are the Driver module, the System module and the Program module.
Driver modules are used to hold any reusable code; for example, instrument drivers (collection of API functions specific to a particular instrument), application drivers (like the Excel® driver) and commonly used procedures and utilities, such as the ATEasy Test Executive. The System module contains hardware configuration objects; i.e., objects used to control the configuration of the system. Common System module objects are procedures that initialize instruments as part of a power-up or shut-down sequence, or in this example, procedures for opening and closing the Excel spreadsheet for data collection. The Program module contains objects for making measurement and testing or validating the Unit Under Test (UUT), or Device Under Test (DUT) - the two terms are used interchangeably in this article. Additional information about the ATEasy modules can be found in the ATEasy On-Line documentation.
The example presented here uses two drivers, one for the ATEasy Test Executive and an Excel spreadsheet driver based on the Excel ActiveX library. The drivers are installed in the Driver folder under the System module. The System module itself contains the code for opening and closing an Excel spreadsheet - not explicitly part of the test or measurement process, but used for collecting the test results for each of the DUT's being tested. The Program module contains the actual test code, or more accurately, the measurement code and pass/fail evaluation parameters. It is the System and Program modules that we will focus on for code development in the example. We will also focus on how to use the ATEasy Test Executive to enable testing multiple devices - without additional code development.
Figure 1 below shows the ATEasy Workspace window, which highlights the structure of the ATEasy application discussed above. Easily identifiable are the Program module - called Multi_Uut, the System module, and the Excel and Test Executive drivers installed in the Driver folder under the System module.
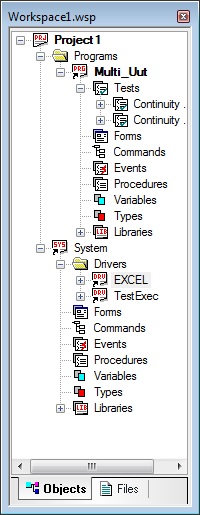 Figure 1: ATEasy Application Structure Figure 1: ATEasy Application Structure
System ModuleBefore discussing the System module code, we need to insert the drivers mentioned above. These are the Test Executive driver and the Excel driver. The Test Executive driver is included with the ATEasy installation and is located in the "Drivers" folder under the ATEasy folder. The Excel driver is also included with the ATEasy installation, but is located in the "Examples" folder under the ATEasy folder. The Excel driver utilizes the Excel Active-X library that comes installed with the Microsoft Excel application - implying that this example will not run without Excel having been installed in the system. A copy of the Excel driver is included with this article as additional functions specific to the example program were added to the driver.
Another aspect of ATEasy's embedded structure are Module Events. While a detailed discussion of module events is well beyond the scope of this article (refer to the ATEasy On-Line help), the general definition of a module event is a container for code that will be executed in a deterministic order within the application. The primary System Events used are the OnInitProgram event (executed whenever a Program Module starts), and the OnEndProgram event (executed whenever a Program module ends).
The System.OnInitProgram event opens an Excel spreadsheet (Workbook) called "MultiUUT.xlsx", and creates a Worksheet for each UUT being tested. Each worksheet is renamed with the UUT number associated with the worksheet. The System.OnInitProgram event also initializes a System variable to the number of devices being tested. As testing for each device initiates a unique thread, i.e., a copy of the Program module, for executing test code, the variable is called m_nThreadCount. The System.OnInitProgram event code is shown below:
Procedure OnInitProgram(): Void Public ! Occurs when a program has started. -------------------------------------------------------------------------------- sPath: String: 256 nRow: Short nColumn: Short nSheet: Short { If m_nThreadCount=0
m_nThreadCount=App.UutCount ! The number of devices being tested
sPath=GetDir(aGetDirCurrent)+"\\MultiUUT.xlsx"
FileRemove(sPath) ! Delete old versions of the Workbook file
Excel File Open New(, App.UutCount, xlwb) ! Create a new Workbook file
Excel Show Application(True) ! Show the Workbook - comment to hide the Workbook
For nSheet=1 to App.UutCount ! Repeat for each device - rename the Worksheet to UUT #
Excel Set Worksheet Name(xlwb,nSheet,"UUT "+Str(nSheet)) ! New function added to Excel driver
For nColumn=1 to 2 ! Repeat for each Task - add Worksheet column headers
Excel Set Value(xlwb,nSheet,Chr('A'+nColumn)+"1","Task "+Str(nColumn))
For nRow=1 to 16 ! Repeat for each device pin - add Worksheet row headers
Excel Set Value(xlwb,nSheet,"A"+Str(nRow+1),"Pin "+Str(nRow))
Next
Next
Next
Excel File SaveAs(xlwb,sPath) ! Save the Workbook
EndIf
}
The System.OnEndProgram event counts down the m_nThreadCount variable as each Program module thread completes. When the last thread closes, the System.OnEndProgram event saves the Workbook and closes the Excel application. There is also a System.OnAbort event that is executed in the event that the operator aborts the test process. As the code performs the same function as the System.OnEndProgram event, only the System.OnEndProgram event code is shown below:
Procedure OnEndProgram(): Void Public ! Occurs when a program has completed. -------------------------------------------------------------------------------- { m_nThreadCount=m_nThreadCount-1 ! Decrement the thread count by 1
If m_nThreadCount=0 ! If the last Program thread is complete, save the workbook and close Excel
Excel File Save(xlwb)
Excel File Close(xlwb,True)
EndIf
}
In addition to the m_nThreadCount System variable, another System variable, "xlwb" is defined to hold the Excel Workbook object. For completeness, the definition for both System variables is shown below:
Variables
--------------------------------------------------------------------------------
xlwb: EXCEL.Workbook Public
m_nThreadCount: Short Public
Program ModuleThe Program module executes code for controlling instruments in order to make a measurement. Each measurement is compared against a pass/fail parameters to determine is the measured value is within defined limits. For this reason, each measurement is contained in an object called a Test. The Test object contains the code for controlling source and measurements and the pass/fail parameters. This example simulates performing a continuity test on a 16-pin IC. The measurement is simulated using a random number generator that produces mostly pass results, with some fail results thrown in for completeness. As in a real test case, continuity is checked against the Vcc and Gnd power pins, which produce positive voltage in the range of 0.6V to 0.7V, or negative voltage in the range of -0.7V to -0.6V, respectively. The code for the simulated measurements for Pin 1 are shown below:
!"Task 1 : "Continuity Vcc"
--------------------------------------------------------------------------------
Test 1.1 : "Pin 1"
--------------------------------------------------------------------------------
Min = 0.6
Max = 0.7
{
TestResult=0.599+(Rnd()/321254.9)
}
...
Task 2 : "Continuity Gnd"
--------------------------------------------------------------------------------
Test 2.1 : "Pin 1"
--------------------------------------------------------------------------------
Min = -0.7
Max = -0.6
{
TestResult=-0.701+(Rnd()/321254.9)
}
...
The Vcc and Gnd continuity measurements are organized into another structure called a Task. A Task is a collection of measurements that are organized by some common theme - in this case, the tests are organized by the power pin the continuity is being measured against - Vcc and Gnd. Figure 2 below shows the example Program Module Task/Test structure. The tasks are "Continuity Vcc" and "Continuity Gnd", while the tests are Pin 1 to Pin 16.
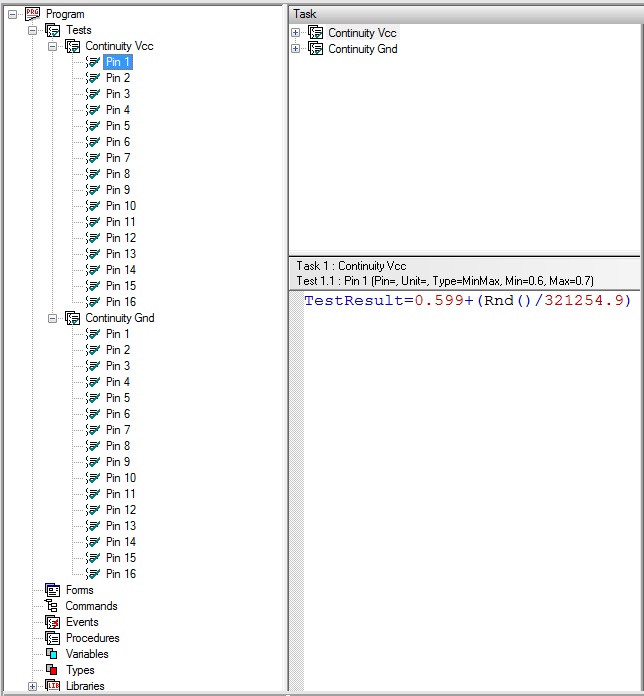 Figure 2: Program Module Task/Test Structure Figure 2: Program Module Task/Test Structure
Like the System module, the Program module also supports module events. The Program.OnEndTest event will execute at to conclusion of each and every test in the task/test sequence. This is a logical place to collect the results of each test and write them to the Excel workbook. The data is organized in the workbook by UUT number (worksheets), the task (columns) and the UUT pin number (rows).
Three properties within the application facilitate this organizational capability. They are the App.UutIndex, Task.Index and Test.Index properties. The App.UutIndex keeps track of which UUT is being tested. Using the value of this property, you can point to the worksheet associated with the UUT currently being tested. The Task.Index keeps track of which Task is currently being executed. You can use this property, with some minimal conversion, to point the worksheet column to store the test results in. And, likewise, the Test.Index can be used to point to the worksheet row to store the test results to. The Program.OnEndTest code is shown below:
Procedure OnEndTest(): Void Public ! Occurs when a program test has completed. -------------------------------------------------------------------------------- sRow: String: 8 sColumn: String: 8 { sColumn=Chr('B'+Task.Index) ! Convert the Task.Index to Excel column characters - works up to "Z" columns
sRow=Str(Test.Index+2) ! Convert the Test.Index to Excel row string
! Write TestResult to worksheet referenced by App.UutIndex, column sColumn, row sRow
Excel Set Value(System.xlwb,App.UutIndex+1,sColumn+sRow,TestResult)
}
Program modules, by default, run tasks and tests in sequential mode, and will run the task/test in the same thread. ATEasy supports two types of sequencing for Multiple UUT testing, sequential and parallel. Sequential sequencing is as described above and runs the task/test in a common thread, while parallel sequencing runs tasks and tests in different threads. For Multiple UUT testing, ATEasy supports these test methods using a combination of special module events, synchronization classes, and application properties. These synchronization classes and events are described in the ATEasy on-line documentation, and are beyond the scope of this introductory article.
Test ExecutiveIn this simple application, Multiple UUT synchronization is handled by the ATEasy Test Executive. The ATEasy Test Executive must be properly configured in order to test multiple UUT's. First, you must make sure to include the ATEasy Test Executive driver in the drivers list, run the application - typically it is the last driver in the list of drivers included in the System:Driver folder. When an ATEasy application is run with the Test Executive included, the Test Executive user interface will be displayed, allowing control of the test process and a test log report of the test results - as shown in figure 3 below.
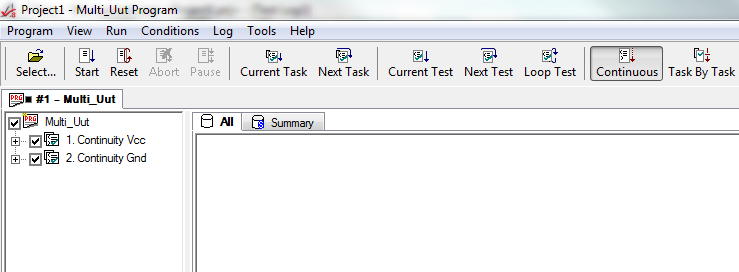 Figure 3: Standard Test Executive Figure 3: Standard Test Executive
For the following instructions, refer to figure 4 below. To configure the Test Executive for Multiple UUT support, while the Test Executive is visible, then from the Test Executive toolbar or menu list, open the Tools:Customize:Options menu, and from the list of parameters, select and set the Enable Multiple UUT's parameter True. The default number of UUT's is 4, although the default can be changed and saved, so may not be the same as in this example. Also set Default UUT Switch Level to Test . After closing the Customize dialog, the Test Executive user interface will update to show a tab for each UUT. Each UUT's tab shows the test log test results and a tree of the UUT program tests, the tab caption shows the UUT index number, the program name and an icon that will show whether the UUT is running (right box), stopped (box). The icon is colored by the UUT status: green for PASS red for FAIL, black for None as shown in figure 5 and 6 below.
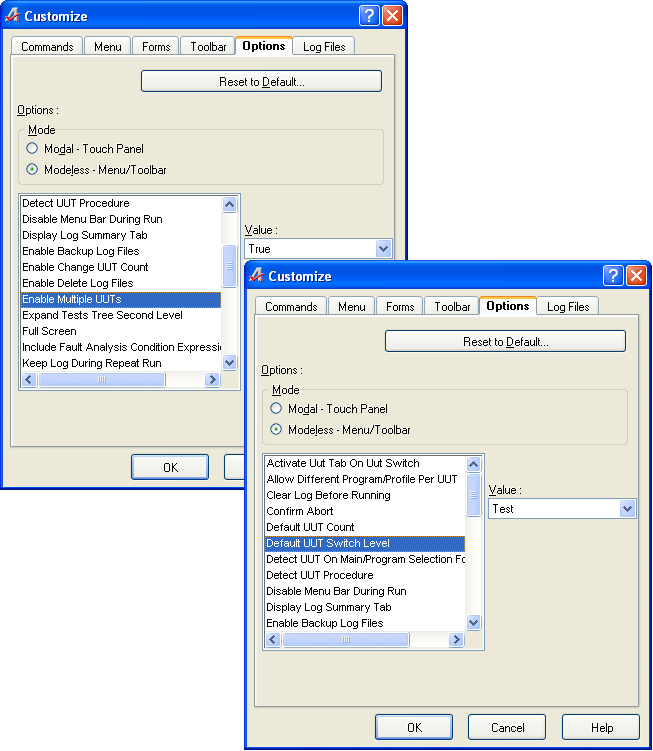 Figure 4: Test Executive Configuration Figure 4: Test Executive Configuration
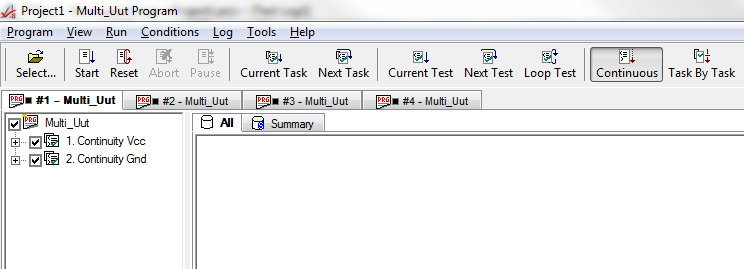 Figure 5: Multi-UUT Test Executive Figure 5: Multi-UUT Test Executive
Running the tests using the default sequential test mode will run all of the Tests and Tasks for each UUT in sequence. You may notice an Excel workbook was opened when the ATEasy tests were started. If you click on the Excel workbook to give it focus, you will see the test results being populated in sequential worksheets in Task/Test sequential order. Figures 6 and 7 illustrate this process.
When all of the tests have completed for each UUT, the Excel workbook is saved and closed. You can open the workbook to review the test results. By design, each time the tests are run, the old workbook is deleted and a new workbook created, so if you want to keep the old test results, make sure to create a backup of the file before running the Test Executive again.
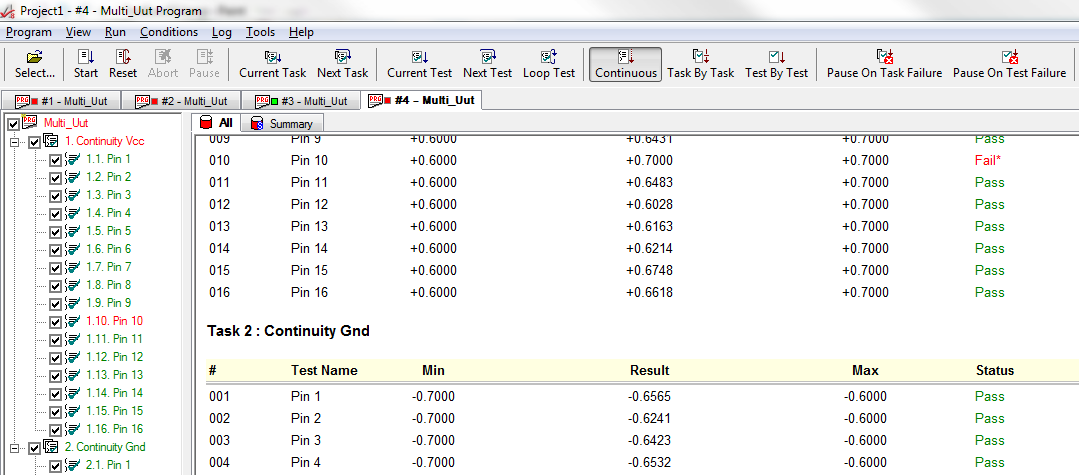 Figure 6: Multi-UUT Test Executive Figure 6: Multi-UUT Test Executive
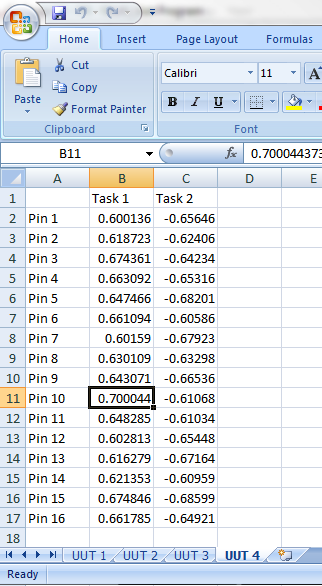 Figure 7: Excel Workbook with Captured Test Results Figure 7: Excel Workbook with Captured Test Results
The test mode can be changed from sequential to parallel, and and UUT count can be changed from 4 to up to 10 in the Tools:Controls:Option, as shown in figure 8. Observing the Excel workbook while running in parallel mode shown the worksheets being updated in a scattered appearing manner. Each UUT's tasks/tests are being run in their own thread, and update their respective worksheet when a measurement is completed. As this happens very rapidly, the worksheet updates appear scattered, but are actually following a the processes defined.
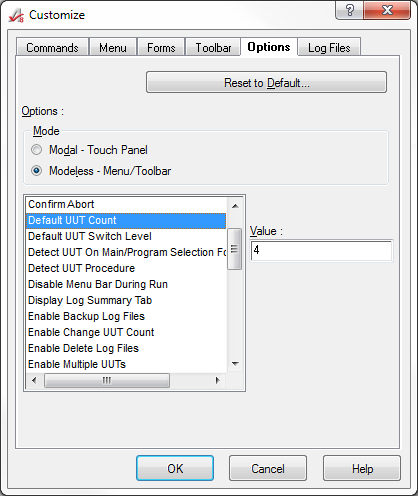 Figure 8: Changing UUT Count and Test Sequencing Figure 8: Changing UUT Count and Test Sequencing
You can also change the UUT count and the program associated to each UUT can be different (if your project have multiple programs). This can be done from the Test Executive Select Program dialog (see the Test Executive on-line help). In addition, you can set the UUT count and the program associated with each index programmatically, See the ATEasy TestExecMultipleUuts.prj example located in the ATEasy Examples folder..
This example can be run on any system with Microsoft Office (ATEasy EXCEL driver) installed and running a licensed or evaluation version of ATEasy. Additional information about ATEasy's Multiple UUT testing capabilities and synchronization objects can be found in the ATEasy on-line documentation.
Download the Multi-UUT.zip Example Files: Click Here
More articles on Multi-Site/Multi-UUT Testing
KB Article #Q200340 - Multisite Digital Test System Design
KB Article #Q200356 - Multi-site-Production-Test-Development-in-ATEasy
KB Article #Q200239 - Synchronizing-Resources-for-Multiple-UUT-Testing
|