OverviewThe Windows® Registry is a database that stores information and settings used by the Windows Operating System kernel, device drivers, and applications. You can access the registry information using the APIs that are included in the ADVAPI.dll installed with Windows. This article demonstrates how to access the registry within an ATEasy® application using these APIs. You will learn how to find the DLL API functions declaration in the WinReg.h header file and how to declare them in your ATEasy application. An example will demonstrate how to query the number of COM ports by using the declared API functions to access the registry key HKEY_LOCAL_MACHINE\HARDWARE\DEVICEMAP\SERIALCOMM.
Similar examples can be implemented using .Net assembly (System.Microsoft.Win32, Registry and RegistryKey classes); however in this example we show how to access the registry using DLL APIs.
Note: Familiarity with ATEasy and the ATEasy IDE is assumed.
Adding ADVAPI32.dll Library to an ATEasy ModuleThe ADVAPI32.dll library is part of the Windows OS and contains ADVanced API services. It provides access to functionality beyond that available with the Windows kernel, such as restarting/shutting down the system, managing services, managing user accounts and access to the Windows registry. The DLL covers a broad range of functions, but those we are interested in - the registry APIs - are defined in the header file WinReg.h. Definitions for the registry functions can be found in this WinReg link.
The Working with External Libraries chapter in the ATEasy Getting Started manual explains how to link a DLL to your ATEasy application. The Getting Started manual is also accessible from ATEasy Help.
You must determine which ATEasy module makes the most sense to have or use the ADVAPI library: as a Driver, within the System module, or within the Program module. Since it's likely these functions could be used in many applications, the most logical place for them to reside would be within an ATEasy driver. In fact, the ATEasy Test Executive includes the ADVAPI.dll as a component of that driver. In this example, the DLL will be placed in the System module.
Note: The functionality discussed in this article can also be achieved by simply including the ATEasy Test Executive driver in your application instead of adding the advapi.dll and declaring the needed functions.
With ATEasy open, double-click the System icon in the Workspace to open the System document. Right-click on the Libraries submodule within the System document and select Insert Libraries Below. Hit enter. From the Insert Library dialog that pops up, select the DLL tab and click on the navigation tool to select the DLL File Name, and navigate to the advapi32.dll file. Click on Insert.
Note: Advapi32.dll is available in 32 or 64-bit DLL and is located under your Windows, System32 folder for 32 or 64-bit Windows respectively. For 64-bit Windows, the 32-bit DLL will be located in the C:\Windows\SysWOW64 folder.
Figure 1: Install the Advapi32.dll
Declaring Registry FunctionsAfter adding the DLL, the procedures list is empty (Figure 2). Unlike a COM/ActiveX or .NET library, a DLL does not contain information that would allow ATEasy to automatically declare the functions residing within the library. To use the API functions, you need to first declare them in the application. For each function you intend to use, you must define its name, define the number and the types of parameters, define how parameters are passed (as a value or a pointer), and define the return data type, if any (void if none). To save time, and to avoid possible errors when declaring DLL functions, ATEasy has a utility that will import DLL functions from a properly constructed header file (Figure 3). The procedure for declaring DLL functions from a header file is to right-click on the advapi32 DLL icon that you just installed and select Import C Header File (.h). After resolving any data type ambiguities, ATEasy will declare all of the functions defined in the header, as well as their data types, and any variables defined in the header file.
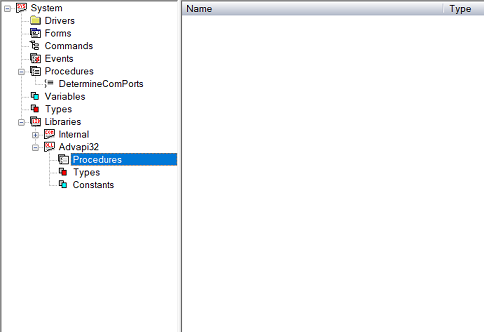 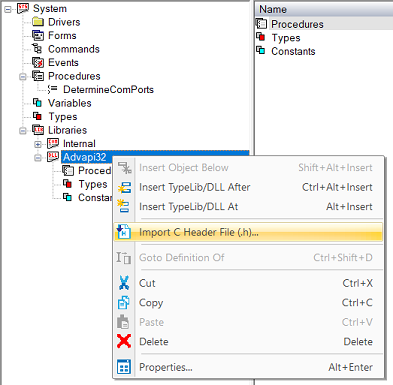
Figure 2: Empty ADVAPI32 Procedure List Figure 3: Import C Header File
There are many more functions defined in the ADVAPI DLL than we need. To keep the scope of this article focused on only what is needed, we will manually declare only the three functions we will use. They are RegOpenKeyEx, RegCloseKey, and RegEnumValue.
To declare the functions, the process is identical to adding any procedure in ATEasy. Right-click in the empty procedure list and select Insert Procedure Below. Enter RegOpenKeyEx and hit enter. Right-click on the RegOpenKeyEx procedure we just created and select Insert Parameter Below. Enter hKey as the parameter name and define the type as Val AHandle. Hit enter. Continue the same process to add additional parameters "after" hKey, entering the appropriate name and parameter type as shown in figure 4. Repeat the same process to declare the RegCloseKey and RegEnumValue functions.
 Figure 4: Function (Procedure) List Figure 4: Function (Procedure) List
The declared functions and parameters require some additional modifications in order to be used in our example. Refer to Figure 5 for the following. Right-click on the RegOpenKeyEx function and select Properties. This will open the Properties page for the selected object. Set each of the functions to Public, Type Stdcall and Returns a Long value.
Windows APIs with string parameters have 2 flavors supporting ASCII and Wide/Unicode versions. For the RegOpenKeyEx and RegEnumValue we will define an Alias for the ASCII version of the function, RegOpenKeyExA and RegEnumValueA, respectively.
When passing parameters into an ATEasy procedure, you may pass the parameter by reference pointer (Var), or by value (Val). The Optional modifier defines whether the parameter is required or is optional. For optional Val type parameters, you may also define a default value that the procedure will use if the parameter is omitted. The example in Figure 5 shows that parameter dwSamDesired is an optional DWord parameter, passed by value, and the default value is 0x2001916
When complete, the function list and associated parameters should look like those shown in figure 4.
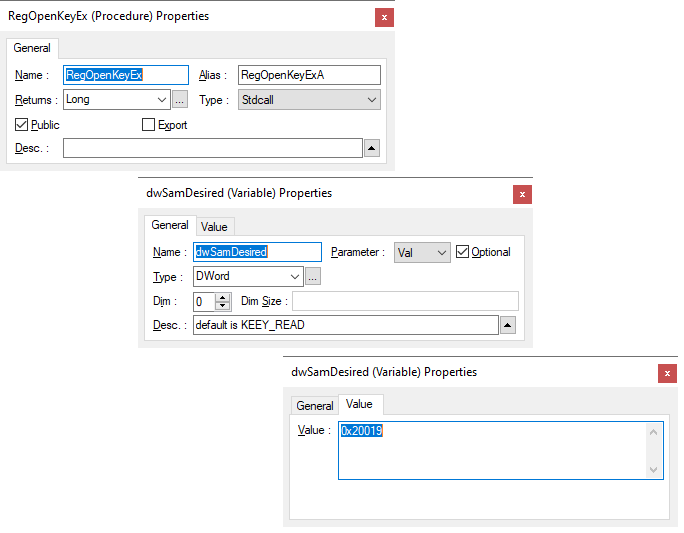 Figure 5: Function and Parameter Properties Figure 5: Function and Parameter Properties
Query COM Ports ProcedureWith the registry API functions declared it is now possible to open the registry and query the number and name(s) of the COM ports available to the system. The COM port information is stored in the HKEY_LOCAL_MACHINE registry key, under the HARDWARE\DEVICEMAP\SERIALCOMM subkey. Figure 6 shows an example of Windows RegEdit application opened to the Serial COM Port subkey.
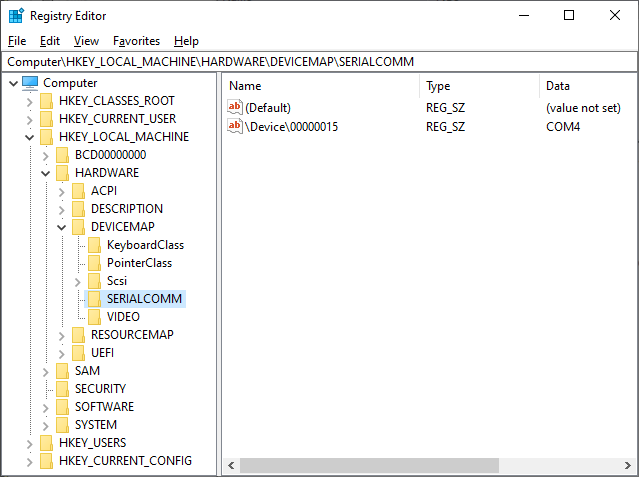 Figure 6: Registry Access Using RegEdit Figure 6: Registry Access Using RegEdit
Use the function RegOpenKeyEx to open the registry. Parameters for this function include the registry key and subkey, and it returns a handle to the specified subkey. The key HKEY_LOCAL_MACHINE contains information about the local computer system. It is a predefined registry key and its handle is a constant value of 0x8000000216. You can use this value for the RegOpenKeyEx hKey parameter, or you can define an ATEasy constant variable as part of the ADVAPI link and reference the key by the descriptive variable name instead. Figure 7 shows constant variables for HKEY_LOCAL_MACHINE and several other registry constants. Note that these constant variables are defined in the Constants submodule under the ADVAPI DLL and are declared as Public. The values for these keys and subkeys can be found in the WinReg.h header file.
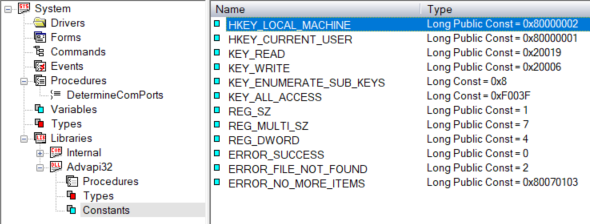 Figure 7: Registry Key/Subkey Constants Figure 7: Registry Key/Subkey Constants
The serial ports are enumerated in the HARDWARE\DEVICEMAP\SERIALCOMM subkey. This parameter is passed as a literal string, but could also be replaced by a constant string variable. Once the key/subkey is open, use RegEnumValue to return parameters stored there. The function returns one indexed value name for the key each time it is called, until no more entries are available. Checking the status returned indicates whether a valid entry was returned or not. After the last call to the RegEnumValue, you must close the subkey using RegCloseKey.
The code in the QueryComPorts() procedure demonstrates the full process of opening the SERIALCOMM subkey, returning the name for each serial port enumerated in the system, and closing the subkey. Reading the enumerated serial ports is an iterative process returning each port name sequentially until the returned status indicates there are no more entries, up to 100 serial ports.
The commented Print statements were used for diagnostics during development and were left commented to provide an opportunity to learn more about the operation of these API calls.
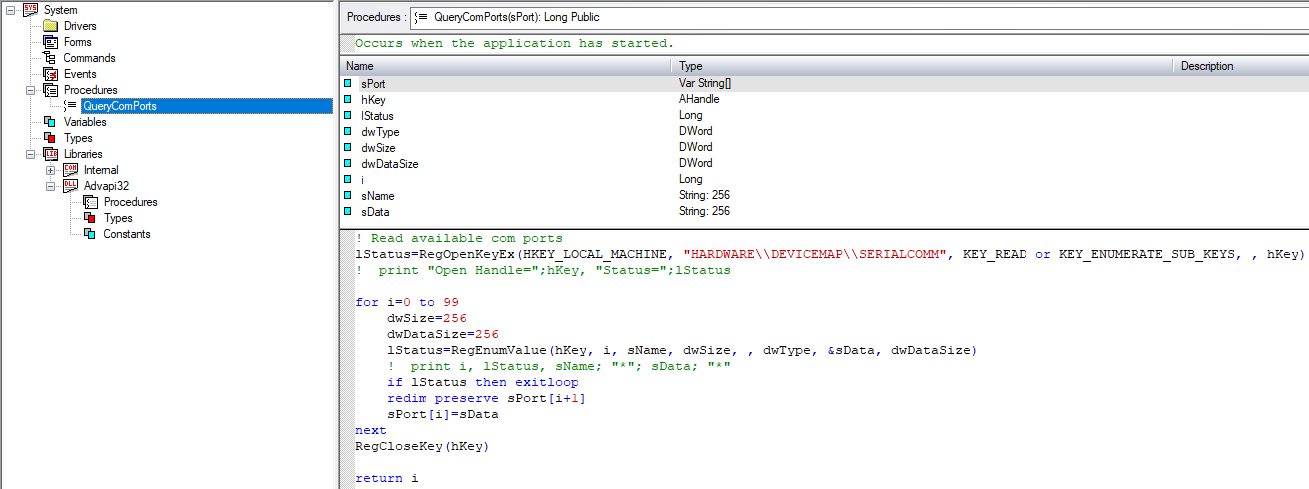 Figure 8: QueryComPorts Procedure Figure 8: QueryComPorts Procedure
Testing The Registry AccessThe final step to demonstrate the registry query is to call the QueryComPorts() procedure from the Program module. The code calls the procedure and iteratively displays the COM port name for each serial port found in the register using the Append statement. Figure 9 shows the Program code. The full example can be downloaded here.
 Figure 9: Calling Registry APIs Figure 9: Calling Registry APIs
SummaryThis article demonstrates how to access the Windows Registry using the Windows advapi.dll APIs. We manually declared three APIs to open, read and close a registry key. The Public System procedure QueryComPorts() was created to perform the register access, which was called from the Program module. The result listed each COM port found in the Registry Key/Subkey HKEY_LOCAL_MACHINE\HARDWARE\DEVICEMAP\SERIALCOMM, and returns a count of the number of COM port entries found - see Figure 10.
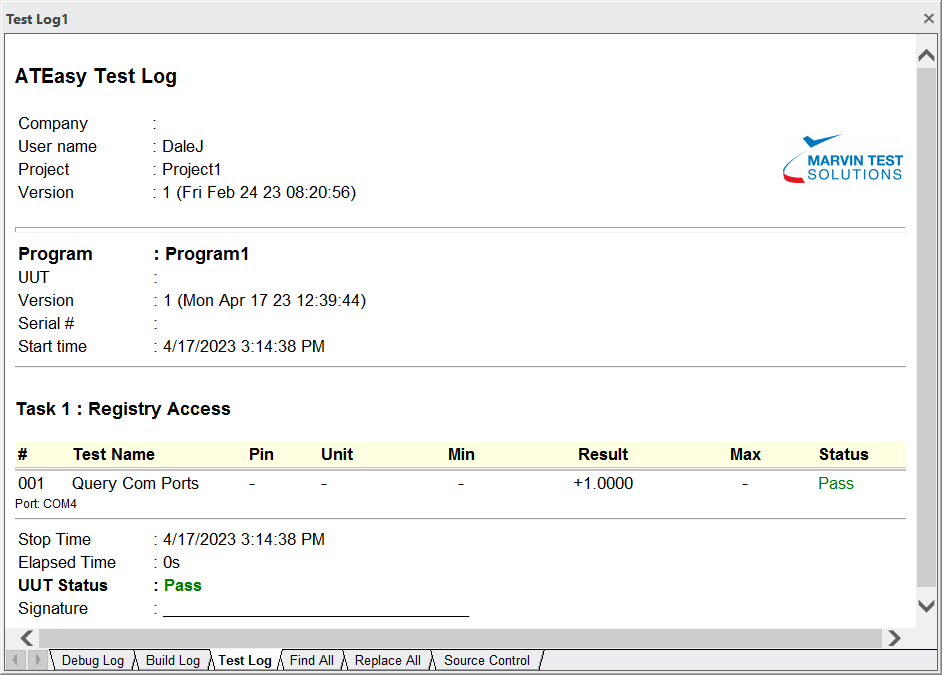 Figure 10: One COM Port, COM4 Found Figure 10: One COM Port, COM4 Found |