IntroductionWith the introduction of ATEasy v8, Multi-UUT testing was added. It is the ability to test Multiple UUTs in Sequential or Parallel mode. Program modules running tasks and tests in sequential mode will run in the same thread, while parallel tasks and tests will run in different threads. ATEasy® supports multi-UUT test using a combination of special module events, synchronization classes, and application properties. This article provides an overview on what these items are and how to use them to create ATEasy programs with the capability to test multiple UUTs within a single test application. This article also presents an example use-case which will show how to use some built-in synchronization features of the Test Executive available in ATEasy v10.
Synchronization ClassesFor multi-threaded tests, it is necessary to synchronize control of your test resources. This is done using Synchronization Classes. Synchronization classes are used when access to a resource must be controlled to ensure integrity of the resource. The synchronization classes available in ATEasy are AEvent, ASemaphore, AMutex, and ACriticalSection. |
|
Here are summaries for each synchronization class.
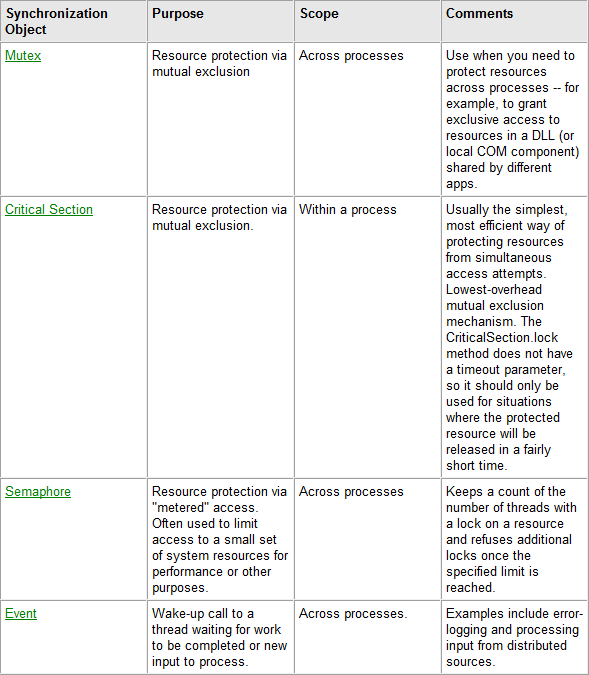 Figure 1: ATEasy Synchronization Objects.
For more information on each synchronization class and example code, search "Synchronization Objects" in the ATEasy Help document.
Events and Properties
There are two Module Events and several Application Properties and Procedure Properties to support synchronizing resource control when testing multiple UUTs and managing test execution.
The module events are supported in each ATEasy module (System, Driver and Program), and are used when running in sequential mode:
- OnInitSwitchUut: The OnInitSwitchUut event occurs just after ATEasy switches from one UUT to another.
- OnEndSwitchUut: The OnEndSwitchUut event occurs just before ATEasy from one UUT to another.
The application object properties (i.e. App.UutCount) supporting multi-UUT test are:
- UutCount: The UutCcount defines the number of devices to test when testing multiple UUTs at the same time, either in sequential, parallel, or both. This number is 1 for single UUT (default) or greater for multiple UUTs.
- UutIndex: The UUT index returns the current index of the UUT running. This number is in the range of 0 to App.UutCount-1.
- UutRunMode: The UutRunMode defines how the UUT tests are run (parallel or sequential). All UUTs running in sequential run mode will run on the same thread. UUTs running in parallel mode will each run in separate threads.
- UutSwitchLevel: Sequential test mode only, the UutSwitchLevel property is used to define when ATEasy switches between sequential UUTs. You can set the switch level to program, task, or test.
- UutLog: The UutLog property is used to set or retrieve the log control of the specified UUT index.
- UutNextIndex: Sequential test mode only, the UutNextIndex property can be used to skip or redirect ATEasy to run specific UUTs.
- UutProgram: A Program object that is used to store the UUT test results and hold the UUT test requirements for each test in that program.
Procedures have two properties, a Synchronize Resource Name and a Synchronize Checkbox that are used for multi-threading or Multiple UUTs with parallel run mode applications – see Figure 2 below.
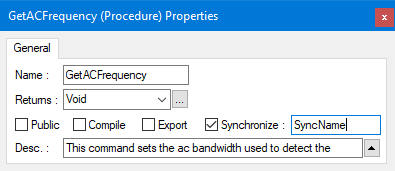 Figure 2: ATEasy Synchronization Properties.
- Synchronize Checkbox: When Synchronize is checked, it allows only one thread to execute the procedure with the specified (optional) Synchronize Resource Name. Other threads executing Tasks, Tests, or Procedures with the same name will be suspended until the procedure is complete.
- Synchronize Resource Name: The Synchronize Resource Name text box is only enabled if Synchronize is checked. Any series of characters/string can be used for the name.
Example Use-Case: Multiple UUT Test For Various Temperatures
The following example explains how to set up a multi-UUT application where the same program in running repeatedly for various temperatures in parallel mode and each iteration executed with different temperature set. Since the UUT programs are running in parallel, for each iteration we must wait until all UUTs are completed for the next iteration with different temperature to be set, and then resume all UUTs to run the program again (OnEndTask for the last task).
In ATEasy v10 the Test Executive has two commands, WaitAll and ResumeAll, which help test programmers with multi-UUT synchronization. The WaitAll and ResumeAll commands were created to aid test programmers in testing multiple UUTs by providing a framework to handle the synchronization. The WaitAll and ResumeAll commands take care of implementing the synchronization objects presented above so the test programmer does not have to.
To demonstrate how to use these functions, we will imagine a possible use-case scenario. In this example we have a test system that does a variety of tests for a UUT. The system is capable of testing multiple UUTs at once. The goal of the tests is to gather data on the UUTs at different temperature levels.
To accomplish this, we need to do the following:
1. Add the TestExec driver to the System Module.
2. Add variables to the System Module to keep track of the temperature.
3. Write tests and supporting procedures for the UUT in the Program Module.
4. Add logic to the Program Module's Events to increase temperature and re-run the tests.
5. Configure the Test Executive for multiple UUTs.
6. Run and verify the application.
System Module
First we will add the TestExec driver to the project. This should be done in the System Module, as shown in Figure 3.
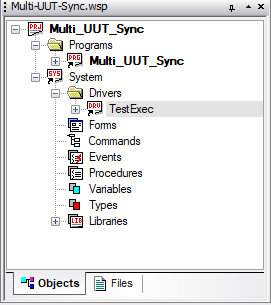 Figure 3: Add the TestExec driver to the project.
Next we add the variables shown below which will be used to handle the temperature of the system.
Variables
================================================================================
nEndTemp: Short Public = 80 ! Last temperature to test.
nIncrementTemp: Short Public = 10 ! Amount to increment temperature each iteration.
nStartTemp: Short Public = 50 ! Starting temperature.
nTestTemp: Short Public ! Current temperature.
Program Module
The program module is used to execute code for making measurements/testing the UUT. We will add some dummy tasks and tests for the purpose of this example. The first task is some voltage tests for the UUT. The second task is some current tests for the UUT.
The following step is optional - in the first test of each Task we add a print statement to show the temperature. These print statements appear on the test log and provide a way to document the temperature before the tests run.
Below is a snippet of the Program module that shows the tasks, tests, and the code within.
Tests
================================================================================
Task 1 : "Voltage Tests"
--------------------------------------------------------------------------------
Id = Task_1
Test 1.1 : "3v Test"
--------------------------------------------------------------------------------
Id = _3vTest
Pin = "1"
Unit = "V"
Type = Other
{
print "[Task 1] UUT: "+str(app.UutIndex)+" - Temp: "+str(nTestTemp)
TestStatus=PASS
}
Test 1.2 : "5v Test"
--------------------------------------------------------------------------------
Id = _5vTest
Pin = "1"
Unit = "V"
Type = Other
{
TestStatus=PASS
}
Task 2 : "Current Tests"
--------------------------------------------------------------------------------
Id = Task_2
Test 2.1 : "100mA Test"
--------------------------------------------------------------------------------
Id = _100mATest
Pin = "1"
Unit = "mA"
Type = Other
{
print "[Task 2] UUT: "+str(app.UutIndex)+" - Temp: "+str(nTestTemp)
TestStatus=PASS
}
Test 2.2 : "500mA Test"
--------------------------------------------------------------------------------
Id = _500mATest
Pin = "1"
Unit = "mA"
Type = Other
{
TestStatus=PASS
}
In the Program module's Procedures we add a procedure to change the oven temperature. For the purpose of this example, we place a trace statement in the procedure to simulate a temperature change. The trace statement is different from the print statements used above. Print statements go to the test log, while trace statements go to the debug log. In our trace statement, we output the new oven temperature that was set and the controlling UUT. The code snippet below shows the procedure SetOverTemp() that was created for changing the oven temperature.
Procedure SetOvenTemp(dNewTemp): Void
--------------------------------------------------------------------------------
dNewTemp: Val Double
{
! Enter code to set oven temperature
trace "\r\n[Temperature Change] Oven Temperature: "+Str(dNewTemp,10)+" - Controlling UUT: "+Str(App.UutIndex)
}
Figure 4 below is what the project looks like in the workspace-view after adding the tests and procedure.
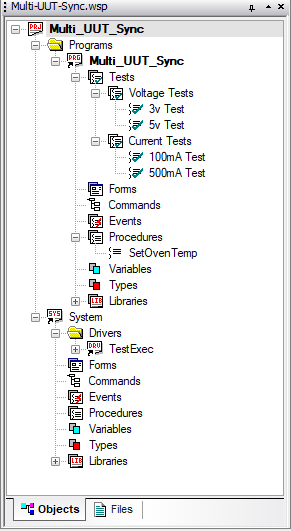 Figure 4: The workspace view after adding tests and procedure.
Program Module Events
In the Program Module's Events we add code that changes the temperature after all tests have completed, and then re-run the tests. We repeat until we reach the user-defined limit (This was set using the variables we created in the System Module Variables).
First we start in the Program Module's Event called OnInit(). This event occurs when a program has started. In this event we set the starting temp of the oven. Here we will be using TestExec's functions, WaitAll and ResumeAll.
Procedure OnInit(): Void Public! Occurs when a program has started.
--------------------------------------------------------------------------------
{
! Set the oven's starting temp.
if TestExec Execution WaitAll(ateUutsSyncFirstCallerReturnsFirst)
nTestTemp=nStartTemp
SetOvenTemp(nTestTemp)
TestExec Execution ResumeAll()
endif
}
TestExec Execution WaitAll:
This command is used to synchronize all UUTs when running in parallel mode.
after all UUTs called the function the last one will return and call call cmdResumeAll to release them from waiting.
TestExec Execution ResumeAll:
This command is used to resume all UUTs that were suspended by the WaitAll command.
In this event (Program.OnInit), we want to set the initial temperature at the very beginning before any UUT has ran their tests. Therefore, we will input ateUutsSyncFirstCallerReturnsFirst as the input for the enUutsSyncReturns parameter.
Next we move to the Program Module's Event called OnInitTask(). This event occurs when a program task has started. This is an optional step - we add a trace statement here to output the task number, UUT index, and the current temperature. We will use these trace statements later to verify that our program worked correctly.
Procedure OnInitTask(): Void Public ! Occurs when a program task has started.
--------------------------------------------------------------------------------
{
trace "[Program.OnInitTask() Event] Task "+Task.Number+" UUT Index: "+Str(App.UutIndex)+" - Current temp: "+str(nTestTemp)
}
In the Program Module's Event called OnEndTask() we handle changing the oven's temperature and re-running the tests. Here we will be using the functions WaitAll() and ResumeAll().
Procedure OnEndTask(): Void Public ! Occurs after a program task has completed.
--------------------------------------------------------------------------------
{
! if this is the last task in the program
if task.Index = program.TestsCount-1
! check if we reached the temperature limit
if (nTestTemp < nEndTemp)
! one UUT will increment the temperature
if TestExec Execution WaitAll()
nTestTemp=nTestTemp+nIncrementTemp
SetOvenTemp(nTestTemp)
TestExec Execution ResumeAll()
endif
! go back to first task of the program to begin the next iteration
Task endevents 1
EndIf
endif
}
In our application, we want to increment the temperature after all UUTs have finished testing.
Finally, we move on to the Program Module's Event called OnEnd(). This event occurs when a program has been completed. After the program has ended (the temperature limitation has been reached), we will create a trace statement telling us that the UUT has ended. This trace statement will be used later to verify that the program worked correctly. In this event we also reset the testing temperature variable (nTestTemp) back to the initial temperature so we can press Run again without having to close and reopen Test Executive.
Procedure OnEnd(): Void Public ! Occurs when a program has completed.
--------------------------------------------------------------------------------
{
trace "[Program.OnEnd() Event] UUT "+str(app.UutIndex)+" has ended."
if TestExec Execution WaitAll()
nTestTemp=nStartTemp
TestExec Execution ResumeAll()
endif
}
Test Executive
Multiple UUTs can be added in the Test Executive user interface. But before we can begin using multiple UUTs, we need to verify that the option is enabled. Start by running the project and Test Executive will open. We can check the multi-UUT option by navigating to Test Executive's menu bar and going to Tools > Customize. In the Options tab locate the option called "Enable Multiple UUTs" and set the value to True. Then click OK to go back to Test Executive.
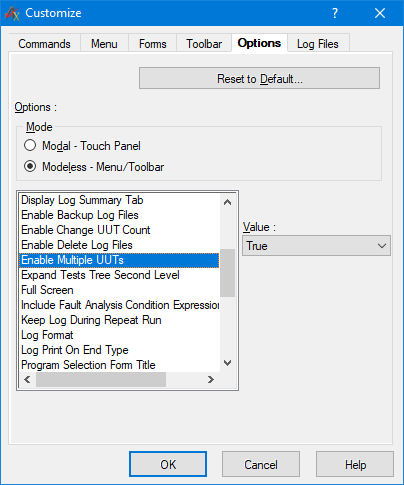 Figure 5: Enable Multiple UUTs.
We are going to add multiple UUTs to our test. Click on the folder icon on the top left labeled "Select..."
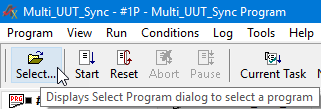 Figure 6: Click to Display the Select Program Dialog.
The Select Program Dialog screen will pop up. Change the UUT Count value to 4 and make sure the Run Parallel check box is unchecked. We will first test our application with 4 UUTs running in sequential mode. After you have finished setting up the UUTs as shown in Figure 5, press OK.
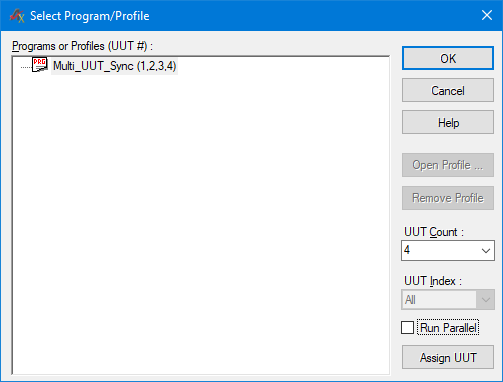 Figure 7: 4 UUTs running in sequential mode.
You'll notice that there are now 4 tabs, one for each UUT we created. Press "Start" or the F5 hotkey to run the program. After the program has finished, you can see the test logs for each UUT by switching through the tabs. The print statements from our tests appear in these logs. The print statements show the task number, UUT index, as well as the temperature. We can see that the tests start at a temperature of 50 degrees, increment by 10 degrees each iteration, and end at 80 degrees.
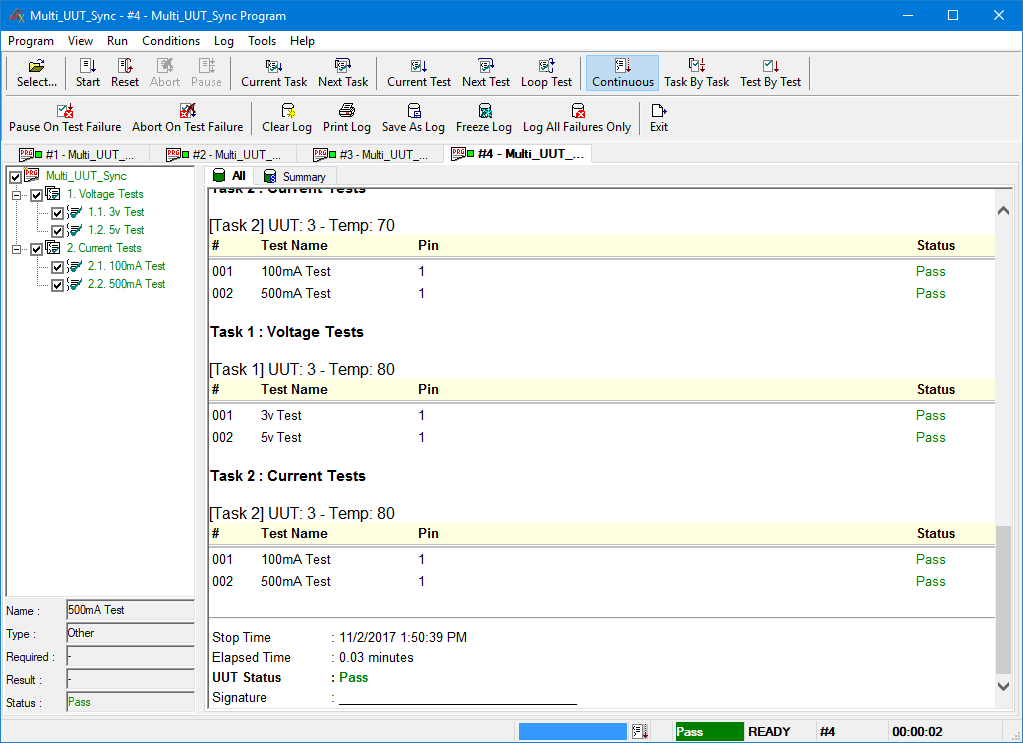 Figure 8: Test Executive finished running.
Next we'll check out the trace statements we created in the Program Module Events. The debug log is found in the ATEasy IDE; see Figure 9. We are able to verify that the order of execution in our application is correct.
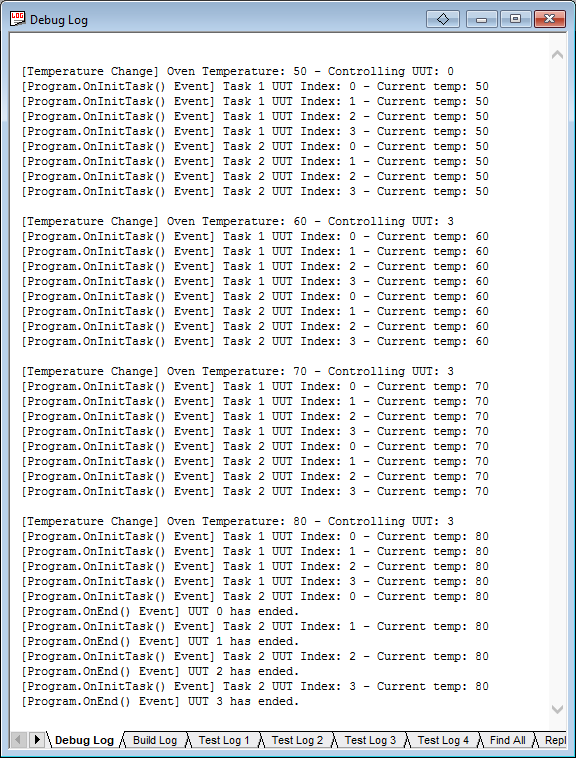 Figure 9: Debug log for sequential mode.
Now we can verify our project is working for parallel run mode. There are no code modifications needed; just launch Test Executive again and go back to the Select Program Dialog. This time we are going to do 4 UUTs running in parallel run mode. Check the "Run Parallel" check box and press OK.
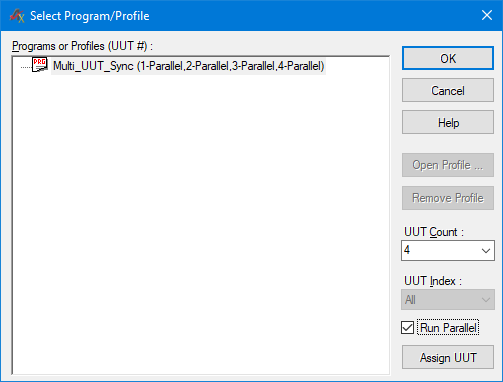 Figure 10: 4 UUTs running in parallel mode.
Press "Start" or F5 to run the program again. This time the UUTs are run in parallel. As with the sequential mode, we can go to the debug log to read our trace statements and verify the order of execution is correct.
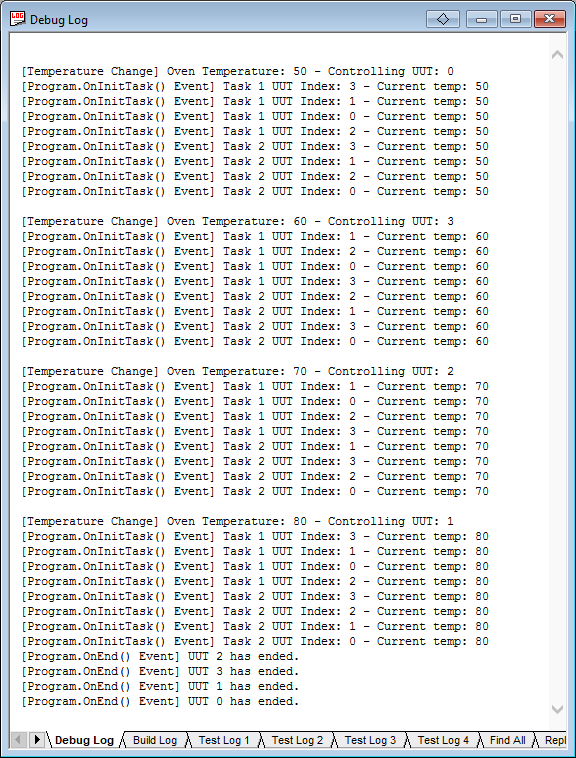 Figure 11: Debug log for parallel mode.
Click here to download the Multi-UUT-Sync.zip example files.
Note: The example contains also the test executive driver that was used at the time the example was written , make sure to update the TestExec shortcut to point to that file.
More articles on Multi-Site/Multi-UUT Testing
KB Article #Q200340 - Multisite Digital Test System Design
KB Article #Q200242 - Testing Multiple UUTs in ATEasy
KB Article #Q200356 - Multi-site-Production-Test-Development-in-ATEasy